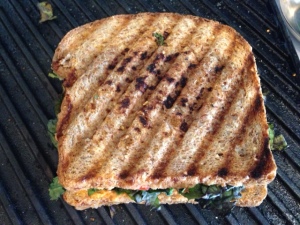
Panini with Greenies
Have you ever made panini at home? It’s really quite easy, even if you don’t have a panini maker. There are a lot of ways to make a delicious, super flat and crispy sandwich, some of which you probably have in your kitchen right now! A panini is really just a grilled sandwich, but let’s move beyond grilled cheese here and consider the greens that you get in the CSA box. Imagine a toasty savory way to enjoy the bountiful nutrition of chard in an easy to carry, portable package! Panini…the answer to lunch.
So the panini can be made with a griddle pan and another heavy pan, such as I will talk about below in my recipe. It can also be made in any type of grilly-pressy kitchen gadget; George Foreman grill, sandwich maker, even waffle irons! The main thing is to grill it and press it flat so that as the greens cook, the sandwich compresses to contain the awesome tastiness!
I was inspired to do this when I saw a video of Rip Esselstyn, the guy from the Engine 2 Diet, making a similar panini for some people. It looked so delicious, I just had to try it with the ingredients that I had on hand in my kitchen. A little while later I was eating the rewards of this inspiration and today I want to inspire you as well.
Panini with Greenies
Ingredients:
Two slices of bread, I used Ezekiel bread but you could use any bread you like. Just make sure that it is a sturdy bread, otherwise it may not hold up to the process.
Hummus, I used homemade Sun-Dried Tomato Hummus, but you can use whatever hummus you like.
Sliced tomato
A large handful of chopped greens, I used kale but chard and collards would also work brilliantly!
Method:
Begin by preheating your panini making item of choice, for this recipe I will talk about a cast iron grill pan.
I always tell my kids that the first ingredient of any sandwich is a plate! This saves me from the mess that generally follows if they are allowed to make their sandwich directly on the countertop. So, on top of your plate lay out your bread of choice and spread on some hummus, a good amount on each piece, and then salt and pepper generously. On one piece of bread lay out some sliced tomato and on the other side a mountain of chopped greens, don’t worry it will cook down to a nice flat panini! Then carefully smoosh both halves together.
Place the sandwich on your grill pan. Get another cast iron pan and place it on the top of the sandwich. In the top pan place more cast iron or, as in the demo by Rip, a barbell! Let the sandwich cook like this for several minutes. Remove the top pan and flip your panini carefully then replace the top pan and continue cooking for several more minutes until your sandwich is perfectly grilled and lunch ready!
During the cooking process the greens will wilt and compress, releasing liquid. This may cause sputtering noises as the liquid drips onto your pan, totally normal…no worries!
I love to slice my panini on the opposite diagonal as the grill marks, it looks restaurant fancy that way! 🙂
Let me know if you try this out and what you thought of it in the comment section below!


Loved this! Super Deee-lish!